What is the ceiling rose/light pendant wiring arrangement?
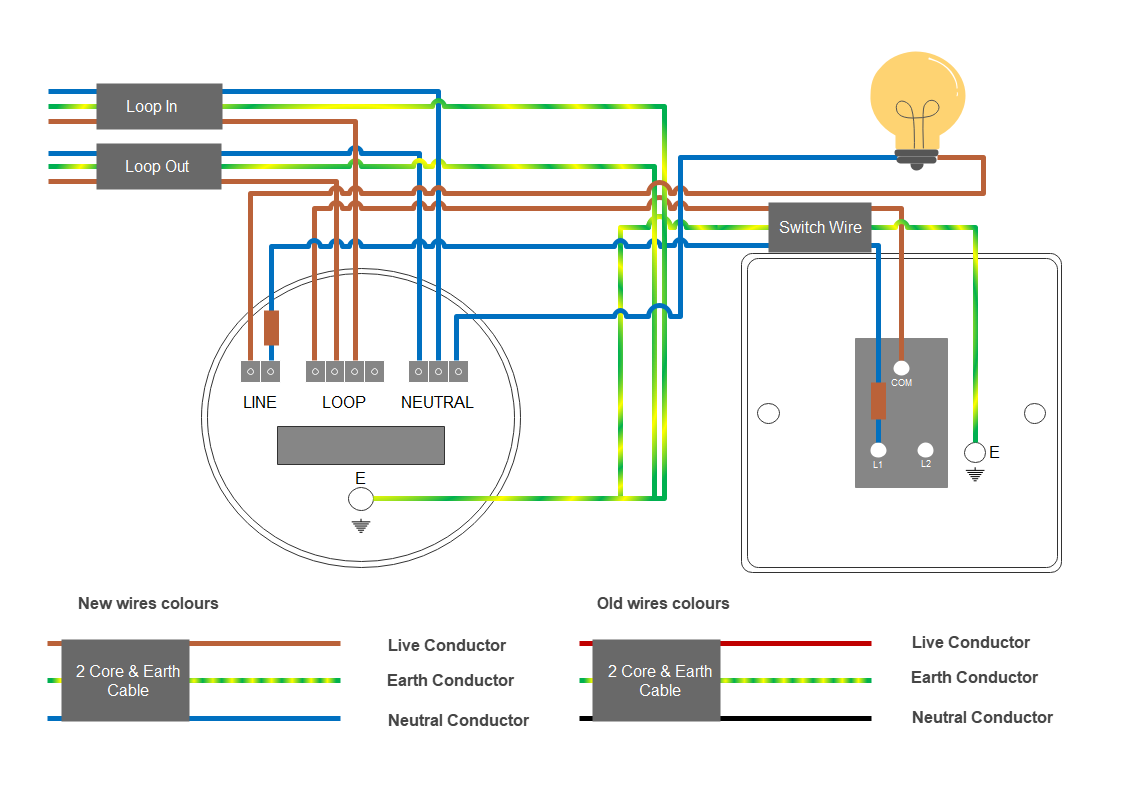
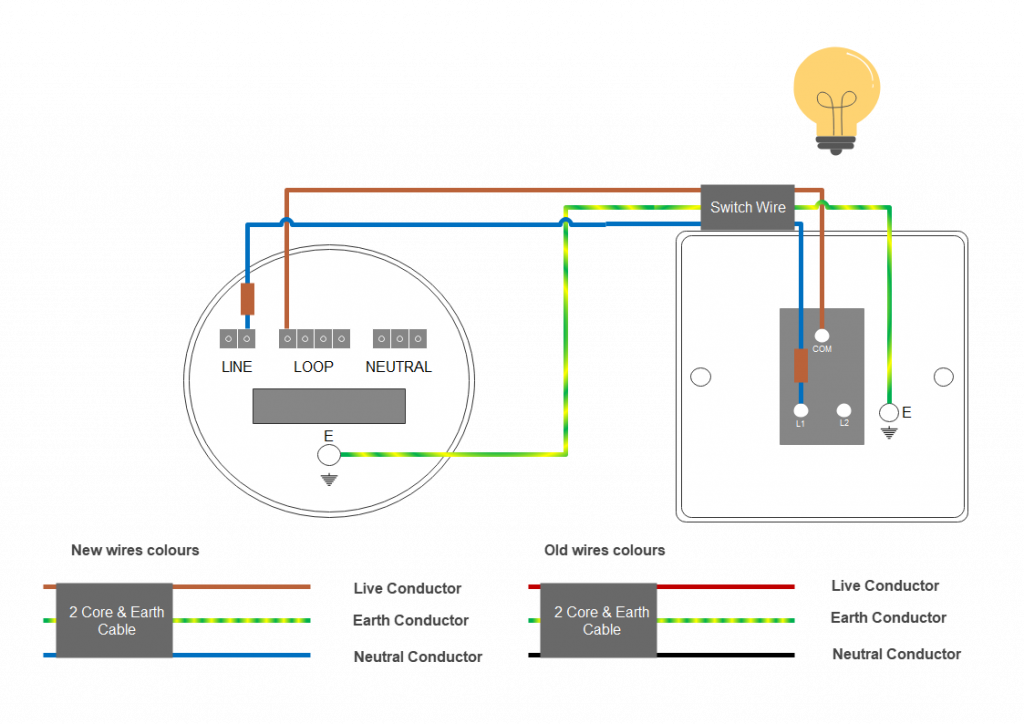
In a typical ceiling rose wiring arrangement you will have four terminal blocks. Three for neutral wires, The central three for live or loop wires and two for switch live and mostly one terminal for bare earth wires with yellow-green earth sleeving.
How many wires are in the ceiling rose/light pendant?
The traditional ceiling rose will be a white pendant hanging down from the ceiling. In most cases we will have 4 cables, you will have one as a loop in which is the power in from either the consumer unit or the previous light pendant/ceiling rose in the circuit if there is light after this one in the circuit you will have one loop out which provides power from the current ceiling rose out to the next light in the circuit. You will have a third cable as a switch live cable going down to your switch and this provides the power from the ceiling rose to the switch which is then returned back for the light/bulb holder when the switch is turned on. From there you will have your cable which goes to your light fitting.
If there is no light after this one or this is the final light in the circuit there would be no requirement for the loop out, whereas there would be no power required for another light. So it’s possible in some scenarios that you will only have looping in cable, a switch cable and a cable going down to your light pendant.
What are the wiring colours?
You may have old style Red and Black wires, use the following chart to colour code to the newer Brown and Blue.
| Old Colours | New Colours |
| Red for Live Conductor Black for Neutral Conductor Bare(green/yellow sleeve) for Earth Conductor | Brown for Live Conductor Blue for Neutral Conductor Bare(green/yellow sleeve) for Earth Conductor |
How to wire light pandent/ceiling rose? & Step-by-step wiring explanation
Step 1:
First of all, from the looping in cables, we take the blue neutral wire and place it into the neutral terminal. Then we take the brown live wire and we will place that into the loop terminal, place the yellow-green sleeve on the bare wire and place that into the earth terminal.
On looping out cables we will do exactly the same. Place the blue neutral wire into the neutral terminal then place the brown live wire into the loop and finally, place the yellow-green sleeve on the bare wire and place it to the earth terminal.

Step 2:
The switch is slightly different so on the switch wire you will take the brown live wire from the loop and take that down to the top of the switch where it is indicating COM. Place a brown sleeve or brown tap for an indication on the blue wire which is now a switch live not a neutral then place it into the bottom terminal indicating L1. On another end in the ceiling rose you place it into the line, again indicating with a brown sleeve. If the switch has the L2 terminal, it is used for two-way switching as per requirement.
Step 3:
Finally, if you are using a normal ceiling rose then all the required wires are at the correct terminals but for understanding, you take the brown live wire from the line which goes down to the bulb holder’s live terminal taking the power when the switch is turned on and off. And you will take the blue neutral wire to the bulb holder neutral terminal which will be returned that back up the neutral terminal.

Conclusion
In conclusion, the ceiling rose/light pendant is the centre point for power termination, distribution to the next lighting point in the circuit and controlling the light using the switch at the wall.